Monday, August 26, 2019

Experimental Archeology - Woad Dyeing

Meistara Reginleif and I have discussed dyeing and dyestuffs ever since I submitted a deep red colored silk/linen piece for competition!  She encouraged me to seek out what was/is possible with natural pigments and fibers vs. the commercially available colors today.  I spent about a year asking questions of artisans that do natural dyeing in order to formulate a good experiment that involved linen and/or wool.  In my discussions, I quickly learned that natural dyeing is quite a bit more challenging than adding a color packet to water and dipping the fiber!  HL Claire le Deyare gave me some great sources for purchasing natural dyes in bulk and patiently answered several of my questions!  I also spoke with HL Katelijne van der Ast at Athenaeum and picked her brain regarding whole cloth dyeing and where I should start!  Since I wanted to do a variety of experiments (thread and whole cloth dyeing), it seemed like woad would be the most approachable for a beginner dyer.  This was due to the heat required (1) and material cost (2).  You do not need boiling hot water to dye with woad (which is good, because trying to heat a whole lot of water without a giant cauldron would prove to be challenging in an outdoors/field experiment and would have been vert pricey to purchase), so that was a plus, and woad is also relatively inexpensive compared to other options such as madder, which was nearly 4x as expensive and required a lot of boiling water.

Woad (Isatis tinctoria) is a type of Indigo dye produced from the leaves of the plant and is common in Europe and Egypt.  Dyeing with woad goes back in time quite a ways - from my own research, I know civilizations were dyeing with woad back in Halstatt times, circa 800 BCE, and likely quite a bit longer in locations such as Egypt.  Per J.N. Lile's The Art and Craft of Natural Dyeing, woad dye is derived from glucoside indican, which is a colorless substance present in the indigo plant. Indigo blue (the oxidized form) is insoluble in water, and will not dye material permanently - the compound must first be reduced chemically to "indigo white" or "leucoindigo" in which form it is soluble in an alkaline solution.  Dissolving woad in an alkaline solution yields a yellow/greenish colored bath that turns blue when oxidized - dipping material into the bath comes out yellow/green and then will change to blue as the chemical is exposed to air (oxygen).  This yields a dye that chemically binds to the cloth vs. a film that sits on the surfaces and would rinse clean with water.  Lile suggests that old urine, lime water, potassium carbonates and/or wood ash all likely would have been possibilities for alkaline solutions for historical dyeing.  

We used soda ash and a chemical called sodium dithionite to achieve our alkaline solution.  I read about 10 different recipes and ended up deciding to do a test vat first to try out Claire's suggested recipe (which was, from my memory, 1:1:1, so 10 g woad, 10 g soda ash and 10 g sodium dithionite) - that may or may not have been correct, but that was what I wrote down in my notes!  I had some measuring tools, but no scale, pH paper or thermometer (so I felt I was doing in fairly imprecise, but - with the exception of the scales, I think it would have been much like this anyway).  I mixed the soda ash with roughly 200 ml of warm water and separately created a paste with the 10 g of woad (with 30 ml roughly of water) - we then combined them in a soda ash solution and allowed 30 minutes to pass.  We then added that solution to a vat of 2.5ish liters of warm water and sprinkled 10 g of sodium dithionite onto the surface.  Note: fiber was soaked overnight to remove oxygen from the fibers and we heated river water in an iron kettle, so there are a number of uncontrollable factors we were likely dealing with related to the composition of the water and adding iron into the mix.  I also used plastic tubs because they were more affordable than copper cauldrons. 

Materials:


Before pictures of linen and wool for dye experiments (linen is the same color as in the cap picture and the wool is a dress I cut out):


First vat attempt:


I knew something didn't look quite right because we should have seen a coppery sheen on the top of the vat and the vat itself should have appeared more yellowish green.  Directions I had printed off from the site I ordered the dyeing materials from (http://www.woad.org.uk/) said to try adding more sodium dithionite.  I did that, which made the color more yellow, but didn't include the coppery sheen I was looking for.  I decided to go for it, since it was just a small test.  Here's some video/photos from the result:

Vat after adding more sodium dithionite:


Here goes nothing:


Dyeing Video:


I decided to do a second dip (which was suggested) to see what happened:


The woad took very slowly (as you can see from the videos) - this may be because the pH wasn't quite right.

First Day Results (I did a piece of linen fabric and bleached linen thread) - both are still wet in the photos:


I was pretty thrilled to have dyed my materials a different color (even though it took more than 10 minutes) and it gave me confidence going into day two!

For my second day of dyeing, I decided to stick with the formula that worked the day before... I just made a lot more of it!  I used 100 g of soda ash, 100 g of woad, and 200 g of sodium dithionite (rough numbers here, I didn't have precise measuring tools, but knew how much I started with the day before).  I dissolved the soda ash in 3 liters of warm water and the woad into 300 ml of warm water to make paste.  I then mixed the two together and waited for roughly 30 minutes - after that, I submerged the solution into roughly 35 liters of warm water, added the 200 g of sodium dithionite to the surface, and kept it close to the fire to stay warm (that was a lot of river water to heat!!).  That solution rested for an hour.  

This time, we got the coppery sheen on top of the vat, but the dye vat was much darker than the day before.  I didn't have more materials to play with, so we decided to just go for it as it was!  I dyed my cut out wool dress, some extra material, and redipped my dyed linen from the day before.  Reginleif dyed a beautiful piece of diamond twill linen!

Woad/soda ash solution (yes, I used a stick to stir):


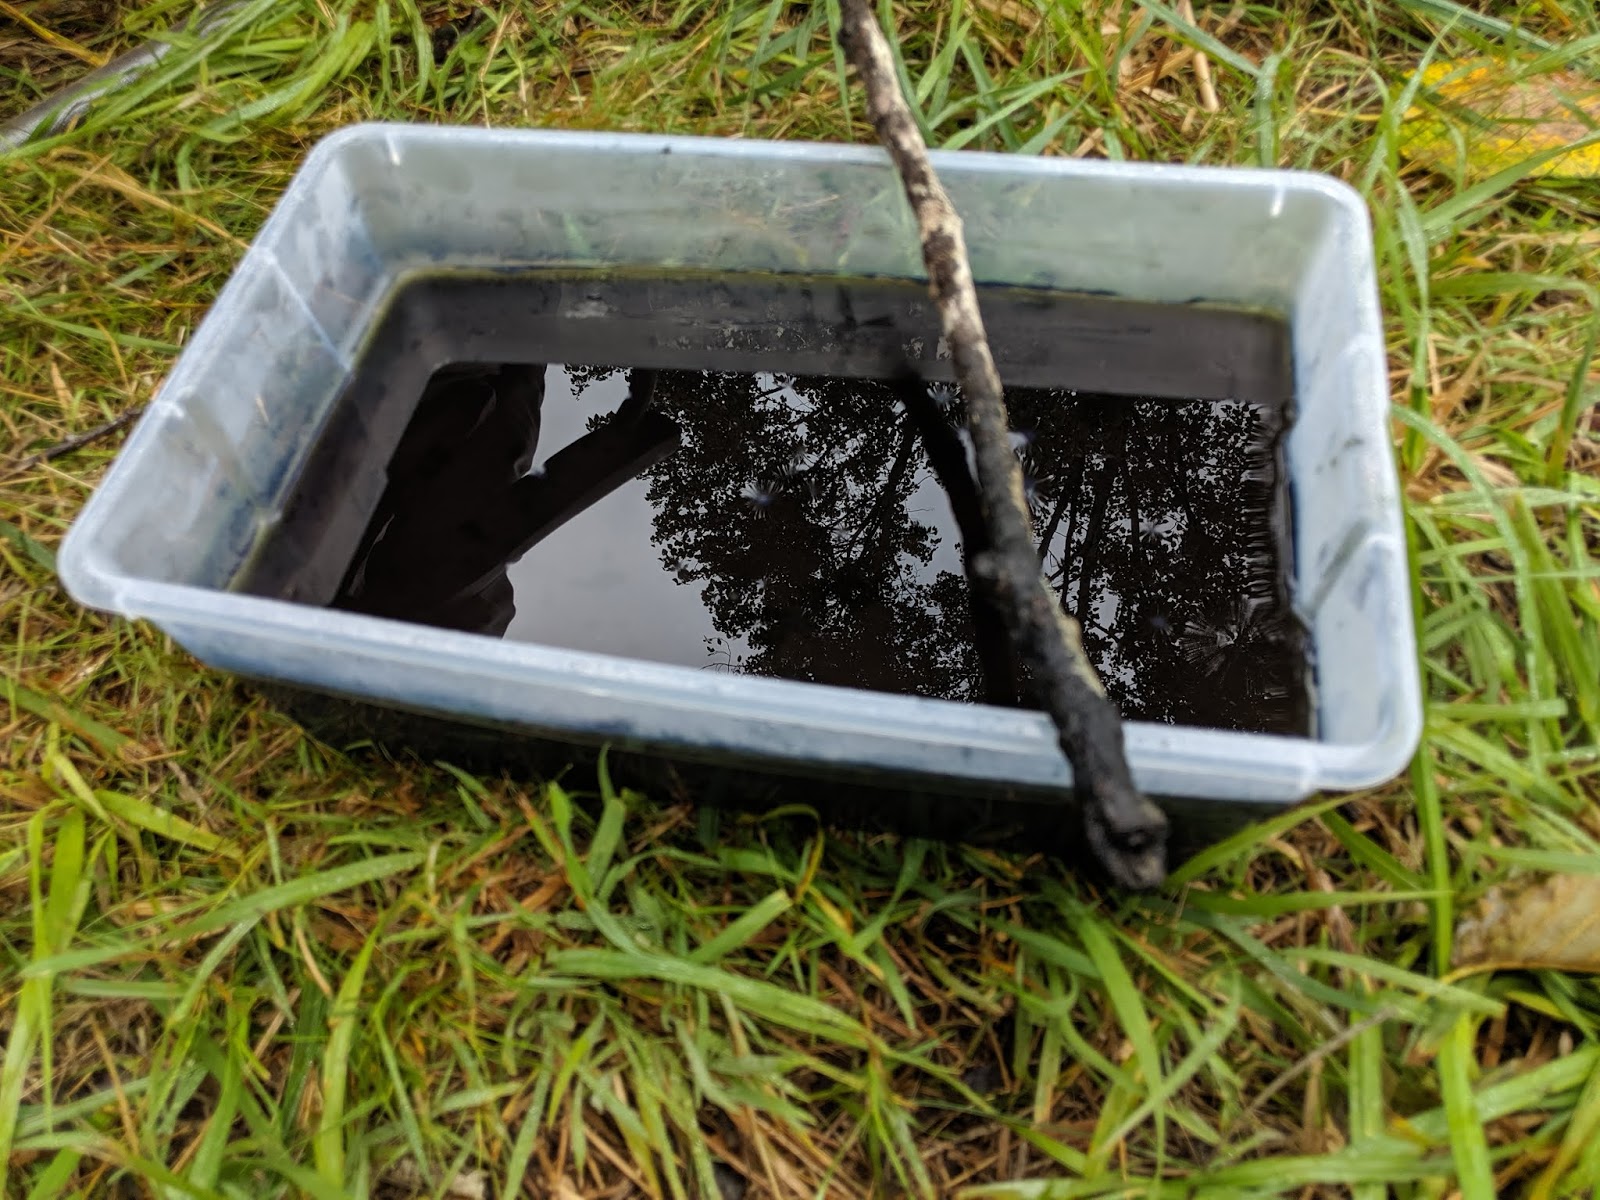
Dye vat with coppery sheen and warming by the fire:


Wool dye video (much faster this time around, so maybe the pH was closer to what it was supposed to be):


Dyeing results (1st dip):


Dyeing results (2nd dip):


We rinsed our work in the river - the water's current helped take the excess dye out of the fabric:


Final Result (Wool - see starting cream color at the beginning of post):


Final Result (Linen - see starting natural color at the beginning of post):


Final Result (Wool):


Final Result (Reginleif's Linen):


I'm very pleased with the results of this experiment - the blue is a lovely color and I look forward to sewing my dress and head covering!

Apprenticing and Early Summer 2019 Projects

I've been very busy this summer, so I have been somewhat neglecting posting about each of the things I've done this summer.  I'm trying to include a lot of updates in one post, so please be patient with me!

First and foremost, I had my apprenticing ceremony in May.  I've been Meistara Reginleif's student for a year and we both agreed that we wanted to move forward with an formalized apprentice/laurel relationship. I was thrilled because I have a great respect for my laurel and have had a lot of fun trying new things to help make the work I do more authentic.  Here is a photo from my apprenticing ceremony (we sword oaths on an oath ring):


I also created this Snartemo II belt for my laurel as a thank you gift for taking me on as her apprentice:


I've also been busy creating tablet woven pieces for others!  Mistress Drifa was put on vigil to become a laurel and had her ceremony at An Tir West War while I was in Japan.  I wanted to contribute to her laureling garments because she helped me quite a bit when I first started tablet weaving - it felt appropriate to create something for her that would show her efforts were appreciated!  I created this unique purple/gold pattern that was sewn onto her underdress and apron panel:


Last, but certainly not least, I created a wire brocade piece for her Majesty Shaya's step down.  The piece went on her apron dress:


I'll be doing more sewing and weaving this fall as I start to plan new garments and my competition piece for Kingdom A&S!  More posts to come!

Monday, July 1, 2019

Athenaeum and Tension/Weight discussion for Warp-Weighted Tablet Weaving

I had a wonderful time at Athenaeum 2019 - as always, I'm simply blown away by the artisans in our Kingdom.  

photo by Steve Somers
I had some simply wonderful conversations about predictive tablet weaving techniques from a fellow tablet weaving artisan (Sofia de Toledo) who focuses on early period patterns.  I have previously struggled with how to visually determine which color will surface with the turning of the tablets and she was able to convey it very simply to me.  When you turn the tablets towards you (back) the top thread furthest from you is the color that will surface.  When you turn the tablets away from you (forward) the top thread closest to you is the color that will surface.  I'd like to think that I'd be able to naturally figure that out, but the concept has puzzled me for about two years until she kindly explained it.  That's why I go to these events, though, so that I keep learning and progressing.

I had the chance to geek out with Mistress Disa about her pictures of brocade from her Sweden trip.  We got to discussing silver gauge and what size was used in various extant evidence.  We only had a brief discussion, but her observations echoed my impression - that 32 gauge silver wire is too small and that the finds likely were closer to 30 or 28 gauge wire.  I plan to do some additional tests to see what matches her photos.

Piggy-backing on this, I recently completed a brocade project with two other artisans (each of us weaving the same pattern).  I noticed a difference in each of our tensioning and asked a few questions about the weight/level of tension used for the project to compare it with my setup.  This got me thinking about the ideal weight/tension to use for my brocade and how the patterns appear in the extant examples.  Previously, I've used weights according to what was found in archaeological finds, but I didn't fully examine whether the weight I used was correct to reflect how the pattern appears in the extant find (in relation to how condensed or spread out the pattern was).  To my eye, higher tension yields the prettiest result, but that may not be the case in reference to the original finds.  My next research project (post dyeing experiments) will likely be related to this.  

I plan to use my warp weighted loom, do an iteration of a pattern at a certain weight, then add weight for every iteration of the pattern so the progression more tension can be observed and compared to an extant example.  I hope to be able to use this tool and compare it to other examples so I can match up the weight used to achieve the end product for each, individual historic piece I recreate.  I think it will be a worthwhile project to help my accuracy in future projects and I look forward to sharing it!

I missed presenting at Athenaeum this year, but still had a marvelous time getting my nerd on with all the artisans.  I also realized that I didn't post anything on my blog about displaying last year, so I'll leave you with a photo of me displaying my initial works at Athenaeum 2018.


Monday, March 11, 2019

An Tir Kingdom A&S

I decided to enter Kingdom A&S as a single-entry this year (well... I decided back in summer of 2018).  I had previously entered my brocade in the Dragon's Mist baronial A&S championship and I wanted to put all the feedback I received to use and complete a much better object to present.  I was extremely pleased with my final result, and the judges awarded me a score of 93 points and I was granted the award "Scholar of An Tir."  This was my personal best score from any competition I've competed in so far, so I was in a bit of shock! 

Below are the pictures of my brocade and my presentation:


Stromgard Baronial A&S "Stormmaker" Championship

I participated in the Stormmaker championship in February and wanted to share some of the pictures from the event!  We had to present two complete entries and create a third entry on site.  The third entry has to be made with fire and the fire had to be created by entrants using period materials.

I presented the Hallstatt 3 tabletwoven band:


I also presented the process of making pit-fired loom weights for a warp-weighted loom:


Here are some pictures of me creating fire and dyeing/sewing my third entry with my laurel (I decided to make a haversack, which came out wonderfully!!):


Monday, January 14, 2019

Garment Finishing / Throne Favors

Before I start all of my Kingdom A&S in-process entries, I wanted to share some of my latest projects!

I recently did a bit of finishing work, everything has been given to recipients and worn, so I wanted to share before I forget.

Below is some finishing I did on a did on an apron dress for my friend's knighting party.  I hand-sewed the neckline, hem, straps, pressed and hemmed down the seams, and did all of the embroidery stitching.  I also created the statement panel on the front (I did not do the tablet weaving).  I'm really pleased with how she looks in it!


I also had the pleasure of doing applique and embroidery work on two throne favors!  Enjoy!

My tablet woven trim did make an appearance on my friend's vigil dress, so I wanted to share it!  I made the trim, but the construction/finishing of this garment wasn't done by me!


I also had fun working with my Laurel, Reginleif, and the other Royal Tailors for the new King and Queen of An Tir.  I learned a lot from the planning process and cut out the pattern and fabric for his majesty's pants.  I hope to participate more on the construction and finishing aspects for their later outfits!