Monday, August 6, 2018

Experimental Archaeology - Warp Weights


At the start of the summer I began planning a rework of the Birka #6 brocade project I created for Dragon Mists’ baronial championship.  My goal is to do a single entry at Kingdom A&S next year, and wanted to incorporate all the feedback I received into a newer, better product.  Part of my judges’ feedback was to use a higher degree of period tools and process.  Prior to using a non-period loom to create my final project, I attempted brocade by using back-strapped tablet weaving technique and failed miserably (I couldn't get the consistent tension required for brocade), so I had a lot of questions about what sort of technique was utilized and started researching the topic from there.  

Birka is problematic because there are no existing loom extant examples, but there’s plenty of warp-weight evidence that speaks to warp-weighted looms being consistently in use.  Tabletweaving on warp weighted looms did occur (as evidenced by tabletwoven borders woven in conjunction with warp-weighted woven cloth), so I theorize that brocade work at Birka (or elsewhere/imported to Birka) could have likely been woven on the loom separately, using the same warp-weighted loom that would already be in the home and in use.  While there's fairly good evidence that much of the brocade was imported (at the very least, some of the materials), there are also examples that suggest the technique may have been learned/copied and produced there, as well (there are a variety of extant examples with a varying degree of expertise).

Rolling with the above theory, I decided in May/June that I was going to use warp-weighted technique in my next reproduction of the #6 brocade.  When I mentioned wanting to make my own clay warp weights to Meistara Reginleif (I’m her student) she suggested I fully research the process and that we could do it sometime over the summer.  Phew… I had no idea what I’d be getting into at that point!  Birka’s warp weights vary quite a bit, but there are a few examples of weights weighing 150-200 g and having diameters of 7-8 cm – so I decided I’d aim for those measurements. Reginleif has natural clay available on her family’s land and we had been discussing an experimental archeology weekend… so we decided that the beginning of August would be the best time to attempt this project.

First – I want to assure you that I knew absolutely zero about ceramics, pottery etc. before doing any of this research.  I still feel like I’m just scratching the surface.  I think that’s one thing I really want to highlight that can be intimidating from viewing things in the Arts & Sciences world – it is easy to assume that people have more knowledge than they do based on what they post, but I highly encourage anyone that is interested in a thing or even interested in just getting the final product to look into how it was done and to try to follow the period steps to do it.  It is very rewarding, even if it blows up – which I was almost 80% certain would happen with this project.  If you are at all interested in how I followed this side-rabbit hole as part of my weaving project, feel free to reach out – I’m always happy to help (and go a little nuts at you, probably).

I read a lot of websites and articles (many of which I’ve linked below) and concluded that they likely used a pit-fire to make earthenware (the warp weights at Birka are earthenware).  Stoneware (what we use for modern ceramics) wasn’t available in that area during that period.  Earthenware is porous and isn't used in daily life in modern times because bacteria can get trapped in the pores of the pottery even with thorough cleaning, so anything we made during our experimentation wouldn’t be appropriate for food/beverage use (warp weights fit the bill perfectly for this type of project). Clay changes to Earthenware at 800-1000 °F so our clay goods needed to reach those temperatures and remain there through out the process.

Using a variety of sources, we put together a basic step by step process of how we were going to attempt this and, of course, everything starts with the clay.  Reginleif did some preliminary tests from our initial discussion of first steps and determined that we probably didn’t have enough days set aside to do everything we needed to do, so she went ahead and harvested the clay and performed the first part of the process (getting the clay dug out and processed into a workable state).  I then shaped the clay into the warp weights.  Reginleif also acquired some commercial clay because we were uncertain if we would be able to get the desired result from the naturally-sourced clay.  I did some coil tests with the natural clay and determined that combining the two types of clay would likely yield the best result (I ended up forming some weights with just natural clay and one with just commercial clay for science)!  We then waited for them to dry.  Our instructions indicated that an oven is modernly used to dry pottery at low heat (around 200 °F), so I used one of the cooking fires for this purpose and hung the weights off to the side to use the residual heat to dry them more rapidly.  After that, we placed them in a pit-fire and fired them for 4 hours before smothering the fire with dirt.  Smothering the fire allowed them to bake longer while the heat died off under the dirt (it also cut off the oxygen which had the added cosmetic effect of turning everything a nice shade of black… I read about the technique in an article and wanted to try it for fun!).  Below are all of the above steps (and associated photos) that describe the process in much greater detail:

Step 1 – Find a good site for excavating natural clay (this is part of a dried up pond on Reginleif’s family property).  Dig up a good quantity for project use (we ended up having a bunch left over)!


Step 2 - Separate any large contaminants (like straw, rocks) to ready the clay for processing.


Step 3 - Add equal parts water to the clay and dissolve as much as possible into a slip (mix until smooth).  An article I pulled information from said the clay should have a smooth, creamy consistency - kind of like gravy.


Step 4 - Coax the liquefied clay through a fine mesh screen to further separate rocks/sand/other large particles from the clay (do this over a second bucket).  Don't use your bare fingers, it'll make them raw and destroy your nails!  One site used a spatula to push the clay through the screen, but I believe Reginleif just used gloves.


Step 5 - Wait a a couple of days for the water to separate from the clay (the clay will sink to the bottom) and pour out some of the excess water.  Then allow some of the rest to evaporate until it is a workable (very wet) consistency.  The timing of the process depends a great deal on how humid it is where you are at (it was very humid the week we were doing this, so drying the clay took longer).


Step 6 - Lay out the clay on canvas (or another cloth surface, we used a drop cloth) to dry further until the clay is a pliable consistency (like clay you'd buy from the store).  You should be able to mold it in your hands without it breaking (too dry) and without liquid being left on your hands (too moist).  

We did a few tests during this process to determine the level of sand content still in the clay (this can cause pottery to break apart during firing).  The natural clay stood up pretty well to the coil test (roll the clay to where its the diameter of a pencil and then try to wrap it around your finger to see if there's breakage - if there is, the sand content is too high).  There was minimal breakage (but still some), so I decided to incorporate a small percentage of commercial clay into my weights.


Step 7 - I formed the warp weights from the natural clay - for most I used a mixture of natural and commercial clay (mostly natural with a little bit of commercial to give it a less sandy texture).  I did do a few test weights with 100% natural clay and one with 100% commercial clay as my "control" weight - I mainly wanted to see what combination of clay turned out the best post firing!  I added one layer of slip (clay/water mix) to the outside of the weights to give them a smoother texture since I'll be wrapping them with yarn and don't want sharp/cutting edges.


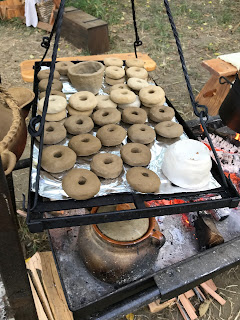
Step 8 - I took the advice I read in an article apply low heat to speed up the clay drying process.  I did this by commandeering Reginleif's and Khalja's iron grills and air baked the weights next to a low heat fire.  I flipped the donuts on occasion, but they never got too hot for me to touch them with my bare hands (just pleasantly warm).  I do think placing the weights near the fire for about 8 hours assisted in speeding up the drying process.  If left to air dry, I think this step would have taken several days.  (We also made some cups for fun just to see if they'd stay intact through the entire process).


Step 9 - I dug a fire pit!  There is a lot of conflicting information (or vague information) on how deep to dig the fire pit and what fuel to put in it.  I ended up using a compilation of suggestions from a variety of different resources.  The pit was dug roughly a foot deep, we then used a base layer of spruce wood chips, and placed the pottery/warp weights on top of them.  We used bricks in between the pottery to provide an air insulation barrier (one article suggested that) and to stop any larger pieces of wood from collapsing into our items during firing and breaking them accidentally.


Step 10 - We added wood chips into the cups and on top of the weights, and then added a layer of cow dung (for insulation and slow burning - many articles suggested an animal dung layer to get higher heat).  We also put some charcoal on top of that and sprinkled a little bit of horse dung because we had that available for our use, too.  Once the charcoal got burning, we felt that it would provide an evenly high temperature over our all our pottery locations.


Step 11 - We then built our fire - Olin suggested that we build several fires in the pit so we'd have fires going everywhere (to facilitate even burning) and that we could just add fuel from there.  We used kindling and cedar to start the fire and alder logs to maintain it.  Special thanks to Tiernan and his boys for all the fire-related help this weekend.


Step 12 - Many articles didn't give any sort of timing as to how long to continuously fuel the fire.  One article said they did it for four hours, so we ended up going with that.  We continuously added alder logs/sticks to the fire for four hours and it got very very hot.  We don't know how hot because we left the temperature gun at the house, but we figured we'd know if it got hot enough by examining our end result so, unfortunately, we don't have any temperature readings to share.


You can see in this picture that the charcoal is doing its job providing that consistent heat layer.


Step 13 - After 4 hours we let the fire burn down a little and smothered it with dirt.  This allowed the residual heat to stay in the pit and continue baking the pottery.  The smothering also cut off the oxygen to the fire which one article said would give us pretty black pottery as the result and I wanted to see if that worked for aesthetic reasons!  We left everything buried overnight (roughly 13-14 hours in the ground).


Step 14 - Digging everything up!  We carefully excavated our fire pit the following morning and hoped for the best.  As we started to uncover things, we got really really excited.  We pulled up the cups first (mainly because we thought they stood the least chance) and were very happy to see that they all made it, turned black like we anticipated, and passed the *tink* test.  Apparently if you flick the pottery with your finger and it makes a *tink* sound, it means you successfully made earthenware and reached the 800-1000 °F threshold.


All of my warp weights but one made it through the firing process, and four were already cracked from baking going into the pit.  All the clay weight examples (natural clay, commercial clay, and mixed clay) successfully made it through firing (and look fairly identical after firing).  I'm really pleased with our results.  


End results were pretty close to the extant examples (check out the deep black color after I washed them at my house).  Can't wait to test them out!  (Photos are my result and the extant example):


All and all it was a beautiful, educational weekend with friends.  I'm pretty exhausted, but can't wait for the next phase of this project!


Below is a list of articles and resources I used - I'll likely do a paper on this topic at a later date.

Web Technique References:
1.    Bartel B.  How to Rework Clay & Fire without a Kiln.  Goshen College. Indiana.  2016.  (https://www.goshen.edu/art/DeptPgs/rework.html)

2.    Beatson P. Experiments with Early Medieval Pottery. NVG Mikligard. 1997.

Further Reading/Research Basis:

(Archaeological)

1.     Andersson Strand EB. Experimental Textile Archaeology. In Andersson Strand E, Gleba M, Mannering U, Munkholt C, Ringgaard M, editors, NESAT X, 10th North European symposium for Archaeological Textiles, Copenhagen 2008. Vol. 5. Oxford: Ox Bow Press. 2010. p. 1-3.

2.     Martensson L, Nosch ML, Andersson Strand EB. Shape of Things: Understanding a Loom Weight.  Oxford Journal of Archaeology 28 (4). 2009.Andersson Strand EB. Tools for Textile Production – from Birka and Hedeby. Stockholm, 2003.

3.     Stirling L. Milek K. Woven cultures : New insights into Pictish and Viking culture contact using the implements of textile production. Medieval Archaeology 59 (1). 2015.

4.     Thorin I. Weighing the Evidence - Determining and Contrasting the Characteristics and Functionality of Loom Weights and Spindle Whorls from the Garrison at Birka (Thesis). Dept. of Archaeology – Stockholm University. 2012.

5.     Klessig BK. Textile Production from Viking Age Graves in Gotland, Sweden (Thesis). Humbolt State University. 2015.

6.     Petty C. Warp Weighted Looms: Then and Now, Anglo-Saxon and Viking Archaeological Evidence and Modern Practitioners (Thesis). University of Manchester. 2014.

7.     Sjobeck A. The Important Craft: Textile Tools and Production in kv. Trädgårdsmästaren in Sigtuna. Lund University. 2014.

8.     Becker CJ, Jørgensen LB, Hvass S, Nielsen LC, Skov T and Stoumann I. Viking age settlements in western and central Jutland: recent excavations. Acta Archaeologica 50. 1979.

9.     Ramskou T. Viking age cremation graves in Denmark: a survey. Acta Archaeologica 21. 1950.

10.  Roesdahl E. Viking age Denmark. British Museum Publications: London. 1982.

11.  Stenholm L. Hushållskärl av aldre svartgods. In: A.W. Mårtensson (Ed.) Uppgrävt förflutet för PKbanken i Lund (Archaeologica Lundensia VII). Kulturhistoriska Museet: Lund. 1976.

12.  Thompson MW. Novgorod the Great: excavations at the medieval city directed by Artsikhovsky AV, Kolchin BA. Evelyn, Adams and MacKay. London. 1967.

13.  Vince A. Aspects of Saxo-Norman London II: Finds and environmental evidence. London and Middlesex Archaeological Society: London. 1991.

(Further Technique)

1.     Nigrosh LI. Low fire: Other ways to work in clay. Davis Publications: Worcester (Massachusetts). 1980.

2.     Primmer L. Pottery made simple. W.H. Allen: London. 1974.

3.      Reigger H. Primitive pottery. Van Nostrand Reinhold Co.: New York. 1974.

Thursday, May 24, 2018

Wedding/Handfasting Commission

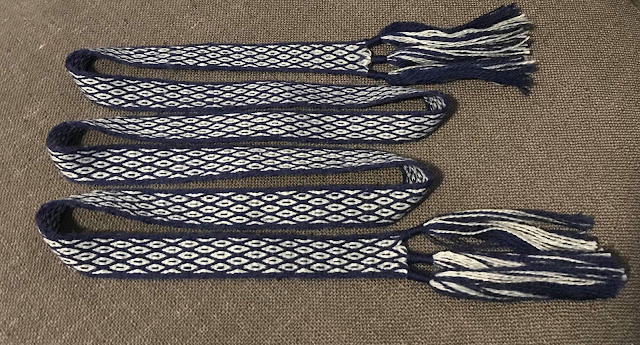
I was recently commissioned to do wedding/handfasting bands for/by Lady Constance, a fellow member of my barony.  I don't normally take commissions... I do some trades sometimes, but I mostly gift things to my friends and/or make largesse.  I decided to do this particular project because I was flattered to be asked to create something for someone's special day and thought it would be a neat opportunity to try out some nice end-finishings I've seen on other bands for non-trim uses.

I work mainly in silk, but the colors available to me for that didn't work with the bride's chosen colors.  After researching a bit, I decided to go with a 2/18 super fine merino wool that came in sage and navy.  I don't work a lot with 100% wool (though I've recently bought a decent amount of it), so this was a new-to-me fiber to weave with.  It was an adventure!  Wool doesn't break like linen does under higher tension, but it felts (which I expected) and stretches a lot!  That did cause a few breaks that I needed to deal with during the course of the project.

Originally the bride wanted two solid color bands, one sage green and one navy.  After discussing it with her, I let her know that I could do a pattern and the inverse of it with relatively the same amount of effort.  We decided to go with a pattern from Applesies and Foxnoses that is pretty and would really show off both colors.

I'm really pleased with how the tassels turned out on the end of the bands - I think it gives it a nice finishing touch and makes it look more like a handfasting ribbon than a piece of trim.


Here is a photo taken by the bride's sister (N. Collins) of the handfasting ceremony:


Monday, March 26, 2018

Dragon's Mist A&S Championship at Carnevale


Phew - I can finally post about this now that the event is over!  Thanks to the guidance of some pretty amazing mentors, I decided to pull back on some pretty lofty goals of participating in my own baronial championship and Kingdom A&S and just focus on one championship entry that was a single entry so I could ramp up slowly and focus on doing one project to the best of my ability.  It was really great advice despite my constant want to do all the things!  I started my project in December 2017 (at least the idea portion) and researched a good deal in January 2018.  Everything seemed so far away at that point!

I ended up researching my little heart out, did a lot of test pieces, failed a few times, got some advice on areas to improve, wrote a long paper (see below), and attempted a final piece... then noticed it looked weird, reresearched and restarted/finished the FINAL final version.

Click here to view research paper on topic.

Then I made a presentation and planned a nice looking display... and somehow managed to get all of it to an event.  It made for a pretty crazy few months and I'm sooo glad that I was discouraged from entering all the competitions I had planned to!  I grossly underestimated the amount of time I was going to put into this project.  I'm leaving out a good deal of describing the production of my object because it is all described in the research paper I've linked above.

I'm still incredibly floored and honored that I was selected as the Dragon's Mist A&S Champion.  Other peoples entries blew me away and when I look back at the past winners for the barony, they are all people that I've flipped through their Facebook photos and drooled over their work.  I'm not ashamed to admit that!  I just hope I can be worthy being in their company!

Here are some pictures of the event that aren't included in my research paper... mainly my display and photos of me presenting (photo credits to D. Antal and D. Hollingsworth):


I'm really excited to have come this far and will grow and refine my tablet-weaving as I continue my journey in the SCA.  I'm scheduled to be at Athenaeum next and I think a non-competitive A&S event will be a nice change of pace!

Tuesday, February 6, 2018

Beginner Tablet Weaving – Belt Project (Draft - 1)


I wanted to make a helpful walk-through for beginners that was a little less overwhelming than some of the ones I've read online.  Hopefully this is something people can follow - would certainly appreciate any feedback!

Introduction

Tablet weaving is a method of producing narrow bands of textiles that can be used as trim, belts, straps, and edging.  These bands can be made up of a variety of colors, patterns, and materials, and use anywhere from 2 to 100+ tablets.  Instead of learning to read patterns, this lesson is focused solely on technique and produces a thin belt of the weaver’s desired length.  This is an exercise designed for individuals who have no prior experience tablet weaving.

Materials

This first lesson is meant to be able to be completed by anyone, and doesn’t require any fancy weaving supplies, just what’s around the house.  Here’s a list of items you’ll need:

A big ball or skein of yarn: You’ll need at least 500 feet of any solid color yarn you’d like.  I highly recommend a wool blend or an acrylic yarn to start out, even if it isn’t quite period.  Certain yarns are very expensive (silk) and/or felt (wool) and make it difficult to work with for new weavers.

10 Tablets: Tablet weaving “tablets” or “cards” can be created out of a variety of materials such as cardboard, thin wood, or even bone.  However, for this lesson, I recommend cutting up a deck of cards from the dollar store.  Most cards tend to be 2.25 to 2.5 inches wide – when creating a tablet make sure that it is roughly square and that it has 4 holes (use a single hole punch, if possible) that are spaced similar to the pictures below.  Perfect dimensions and spacing is not necessary – just get them as close as you can.

1 Cheap Ruler*: 12 inch ruler is best.

Toilet Paper Roll/Pencil*: You’ll need something to pass the yarn through your weaving that is smallish and that you are able to wrap a bunch of yarn around.

*If you have a weaving shuttle like this example or similar, you don’t need the ruler and a way to hold yarn, but the ruler is nice to have to measure the width of what you are creating to make sure it stays similar throughout.

Large, Heavy Object: You’ll need something that doesn’t move easily to tie your weaving to.  Examples: door knob of a closed door, dining room chair, desk leg (I use the handle of a heavy music amplifier).

A belt of some sort

Carabiner (optional): I find a carabiner or similar tool to be useful if you want to tie the end of your weaving to it and hook it onto something.  This makes your weaving mort portable and easier to manage.

Safety Pin (optional): Great for locking your tablets in place.

Preparation

Determine what size of belt that you might want (I find 6 -7 ft works for most people, but measure your waist and how long you’d like the tails of the belt to be).  The length of yarn we’ll be cutting will be the length in inches x 1.2 + 20 inches.  So for a 6 foot (72 inches) belt you’ll want to cut lengths of 106.4 inches, but I’ve found that rounding it a little is A-okay, so even 100 inches even would probably work just fine if you don’t want to be exact!  It is okay to make shorter lengths if you want to practice initially before doing your final belt (I recommend at least 3 feet per strand, however).

Next, assuming you’ve already made 10 tablets as described in the materials section (if not, do that now), you’ll cut 40 pieces of yarn to the number of inches you’ve determined in the above formula.  So I’d have 40 pieces of yarn at the end – each measuring 100 inches in length.  This will take a good while (set up tends to be the longest part even if you eventually learn a quicker method).  If you have a cat or another type of pet that LOVES yarn, do this in a room without them!

Once you have your 40 lengths of yarn, try to keep them neat and untangled and tie one end (all 40 strands together) in a double knot onto your carabiner or large object, and then you’ll begin threading your tablets.

Thread 4 strands of yarn into each tablet.

NOTE – it is VERY important that you thread all your tablets on the same side like the below example:


Once all the tablets are on (you should have 10 tablets with 4 threads through each) make sure you have all your materials handy because you’ll start weaving soon!  This is a good time to take a break if you need one, just make certain your tablets don’t fall off the strands (tie a temporary knot at the other end if you need to).

When you return, wind about 20-40 ft of yarn onto your toilet paper roll or pencil or weaving shuttle, whichever you have at your disposal.


This yarn is what you will use to weave through the tablet-attached yarn.  It is called the weft.  The yarn with the tablets attached to it is called the warp.  These terms will come in handy when you are reading patterns later in your journey!

Once you make sure you have your belt on, your ruler handy, and your toilet paper roll (or other) of wrapped yarn, you are ready to start.  Go ahead and tie a knot at the other end of the 40 strands of yarn (if you haven’t done so already) and wrap it a few times around your belt.  This is just to get it momentarily out of the way.  After that make sure your tablets are close to you and put tension on the threads (by making sure there’s some distance between yourself and where the yarn is tied to the object).  The threads should be tight and look like this:


Make sure all your tablets are organized in a nice straight row and pull that towards you and push them away from you to make sure they move smoothly.  Here’s mine in a nice row below:

 Here’s where it gets a little tricky and if you mess up this next part, it is okay, the pattern will still work it just might look a little less tidy (which is okay for your first few attempts!!).

Tablets that have been threaded correctly (all one direction as described above) can be flipped horizontally to change the direction the tablet is threaded.  These “directions” are called S facing or Z facing depending on the shape the thread makes through the tablets (see the below diagrams): 

These are side views of the cards (so a bit hard to see), but what is important to note is the direction that the thread is exiting the card and going towards you.  If that is on the right side, it is an S-facing card, if it is on the left side, it is a Z facing card.  S can also be symbolized by “\” and Z can be symbolized by “/” – if you see those notations instead of letters.

That brings us to how to arrange the tablets.  For this pattern, I’d like you to alternate them S on the outside left, followed by Z and so on.  Below are two types of patterns you might see for this particular project.  A through D are the 4 holes in each tablet (all a single color in our case) and 1 through 10 are the number of cards we have.  You can see how you’d thread different colors in different cards if a pattern told you where, but we won’t worry about that for this exercise.

The “thread” location tells you what card should face what direction – S or Z from left to right.


Once you’ve flipped all the cards to where they are facing the right direction, unloop the knot-tied end of your yarn from your belt (don’t untie the knot, itself), get your ruler and yarn wound around the toilet paper roll and you are ready to begin!

Weaving

Believe it or not – this is the easy part!  Be certain to always maintain firm tension (the warp yarns should always look completely stretched out)!

Move the tablets (all together) forwards (away from you) and backwards (towards you) without turning them.  This will open a shed for you to weave through (a separation between upper and lower warp yarns).  It’ll look like this:


Holding the end of the warp (threads attached to tablets), you will run your yarn (attached to the toilet paper roll) through that space, leaving a little tail out one side.  Then you’ll turn the tablets (all together) a quarter turn away from you (forward) with one hand.  The space between the bottom and top threads should appear again, like the pictures (if it doesn’t, move your tablets forwards and backwards without turning them and the shed should appear). 

Pick up your ruler and place it in the shed, pushing the yarn you just wove with the toilet paper roll back towards you.  This is called beating the shed and it will make your weave tighter.

Next, insert the toilet paper roll yarn the other way, turn all the cards forward (away from you) a second quarter turn and the pull on the thread to make certain it is tight against the sides of the warp thread and use the ruler to “beat the shed.”

Continue forward doing a total of 20 lines of forward quarter turns (weaving through the shed each time).  I find it useful to write a hash mark after every line to keep track.

After 20 forward turns, do the same thing, but turn the tablets back (towards you) a quarter turn instead and do so for another 20 turns.  This will prevent twisting of the yarn and make it more manageable to work with.

The ruler will help you keep the width consistent, too!

Eventually, when you get to end of the belt, you can tie knots on both ends to secure the belt from becoming unwoven, or you can be more creative by knotting or braiding individual warp strands – whatever your personal preference is.


If you run out of yarn for your weft, you can double knot a new strand of yarn to the old one before it runs out!

Thursday, February 1, 2018

Trim for a Knighting

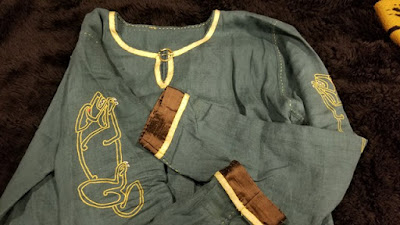
Last November I found out that my friend Anton would be sitting vigil to become a Knight in the SCA.  For those who aren't aware - that's a really big deal and it can take many years to achieve.  I wanted to contribute since he said he liked my stuff, so I went ahead and made him the lanyard he said he wanted to commission from me (easy peasy, right??).  I posted the lanyard in a previous entry because it ended up winning the beginner A&S competition at Yule.  Then I saw that his lady was looking for people to help make his regalia for the ceremony, and after some back and forth we decided that I'd do the trim for his tunic.

At the time this was the most terrifying prospect I had ever signed myself up for.

Not only was I fairly new at all of this I - 1.) care about Anton and wanted him to look really nice on his special day, 2.) knew that this would be seen by a lot of people, 3.) wanted to give him something that wasn't just a run of the mill easy pattern so it would be "special" and "fancy."

So basically that meant I had to up my game *and* execute the whole thing to my standard of perfection.  Thankfully, I didn't have to choose the colors or anything like that - I just had to select the final pattern and do the weaving in the amount requested.

Here it is off the tunic and on the finished product.  I'm really pleased with it - it is a really small part of the overall look, but I'm happy to have contributed a portion and did my part to make it look nice!  Next time I'll be a little less nervous, I think, but I was really glad to have this experience - it built my confidence a lot!