Wednesday, November 15, 2017

Two Silk Sets Finished

I finished a couple of projects this week that I had mentioned in earlier posts.  The blue/black/gold trim will be a gift that I'll pair with an earlier set I did in the same color combinations.  The second was the more difficult pattern from the Applesies and Fox Noses book.  I messed up on the more difficult pattern, but I'm happy that I got a length out of it that I can use as trim for an apron panel or some other smaller purpose.
Broken diamond pattern in blue/black/gold for a friend!

New trim with the trim I did previously for the same person.

Completed trim in the more challenging pattern.


Everyone makes mistakes sometimes - this section has about eight... it was a learning experience!


Monday, November 13, 2017

More Silk, Patterns, and Resources

I'm in the midst of several projects for friends, this blue/black/yellow silk number being the latest one!  I like the pattern, it kind of reminds me of water even though they are broken diamonds.
The silk thread makes all of the patterns look very crisp in delicate.  Most patterns are blocked like they are for wool, so it is always a bit of a surprise what they'll end up looking like.

A "beginning" shot.  You can see that it takes a few rows to set the pattern and the width nicely.

This is the pattern I used for this project.  The books I mentioned in previous posts are informative on how to read patterns.  I read them visually, so I do not need them to be listed A, B, C, D.  The top box is the top tablet hole furthest from me, the bottom box is the top hole closest to me, the second to top box is the bottom hole furthest from me, and the third from the top box is the bottom hole closest to me.  The colors are the color of thread to use (it can be any color, so long as it is different from the other one).  It also tells you how to have the tablets positioned (in S or Z which is how the thread is run through the tablet).
I've been enjoying the Historical Tablet Weaving Facebook forum lately - now that I understand how to read patterns and what to look for, I can save things that I like and might use some day.  A Finnish contributor recently posted their blog with an exciting pattern and research that I'd like to look at a little bit later in my weaving.  Here's an example of what I'm aiming for in my own SCA experience/research: https://hibernaatio.blogspot.fi/2016/09/new-research-on-hallstatt-3-tablet.html?m=1

It is a beautiful band and not entirely beyond my grasp.  Getting to this point in the process is cool because I can understand the difficulty of patterns and see how close I am to being able to do them.  As always, post if you have any questions (or advice!).

Saturday, November 11, 2017

Advanced Beginner Pattern in Silk

Most of the weaving I've done so far is very simple where I move all the tablets forwards and backwards at the same time.  More advanced patterns require you to move tablets individually at different intervals to create more complex designs.  This pattern in silk requires you to turn different combinations of tablets at different times and is more complicated than previous ones I've done.  I'm not showing you the first section because I messed it up upwards of four times and had to reset it.  My friend Stephanie got to watch me rip my hair out attempting it.  After all of that, I managed to get the hang of it and I've been very successful going forward with it.

I know that most of my friends can't tell the difference between an easy pattern and a difficult pattern (unless it is really fancy), but I'm proud that I'm now at the point where I can look at something and sort of tell how difficult it was to make.  That's kind of cool, I think!

This advanced-beginner pattern was from the foxnoses and applesies book I mentioned earlier in this blog.

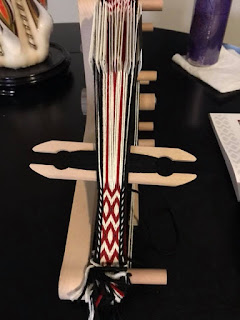
This trim is for me if it turns out okay.  I picked red, white and black as my colors!  It is going well so far after about 4 mishaps!  This may not look harder than patterns I've done previously, but it is!

Silk Trim Projects

I recently started using silk to make garment trim.  This is probably what people would have preferred I started with, but I wanted to work with a material that was a little easier and wool is nice and forgiving to start weaving with!  Silk is very fiddly to work with, but the finished products look so pretty!  I also was told that it was the next easiest fiber to work with, so that factored into my choice to start working with it too!  I hear linen is extremely unforgiving so I'm putting that off for right now.

I asked the forums I'm in for what silk yarn/thread was the best for tablet weaving garment trim and received several responses, but I eventually chose a 30/2 weight silk made close by in British Columbia.  Here's the link for those interested: https://janestaffordtextiles.com/product-category/yarns/silk/handdyed-30-2-bombyx-silk/

Here's the silk colors I ordered - red, black, grey, ivory, sage green, light blue, golden yellow - I had them spooled because I can't even imagine this weight as a skein.  I'd have made a total tangled mess of it.


Working with this weight of silk is pretty much like weaving with sewing thread - it is extremely fine and a little maddening at first.  I guess I'm getting old because I can barely see what I'm doing when I'm stringing my loom! 

I made the mistake of starting with a more difficult pattern and, because I wasn't used to working with the material, messed it up horrifically and almost scrapped the entire project before being talked out of it.  I was able to switch to a different, easier pattern and finished it out - which is good because I ended up with a lot of usable trim that I'm going to gift to a friend.

I was doing a different pattern before I messed it up and switched to this one.  It looks much nicer like this.

The finished product is really nice, you'd never know I cut off 4 inches of terribleness.
Since my initial mess up, I also made some trim for David to go on a tunic, and I have quite a few more projects lined up, which is good because the silk comes in spools of 1650 yards... so I'm sure I'll have enough for a little bit.
This is a really simple pattern, but the black and white makes it really fancy looking!

David is checking it out - he seems to really like it!

You can see how thin and delicate the silk is - it rolls up so neatly!


Leg Armor Ties/Garters

I got a request to make some leg armor ties/garters for David, so I set about trying to make something easy, but cool that I won't cry when it needs replacing.  These ties will be used to mark his leg armor that is hidden by his pants for tournament purposes.  They can also be used to tie wickelbander/winningas which he may use them for too.  Black and white are his colors so I wanted to make something with that in mind, but that would also be very visible to people fighting him.  This is what I came up with - I'm pretty proud which how nice something simple and clean can look!
I used my small inkle loom to make this since my large loom had Colin's belt on it at the time.  These are made of the wool/silk blend yarn I use for all my "wool" projects.

Here's the finished product - nice and simple, but really quite pretty!  He was happy with them!

Tablet Woven Edging

I joined several tablet weaving pages on Facebook and was doing some google research and came across some examples of tablet woven garment edging.  Historically speaking, the examples of this are for button holes and skirt edges to provide additional integrity to a garment, but I thought it looked cool and wanted to try it as a garment accent to a wool hood a friend made for me.  The same friend bravely volunteered one of her tunics for me to test the technique on and a fellow SCAdian in my kingdom named Anita gave me her classroom notes on tablet woven edging and they were INVALUABLE for this project.  I may post them a little later if I get her permission to do so.
This is a two-tablet edge I did on the neckline of my friend Stephanie's tunic.  It looks like a braided edge - I think it is pretty cool!

Here's what the final neckline looks like!  It gives the tunic a nice pop of color!


Stromgard Barony Demo

I participated in a SCA demo with my barony in October.  I originally volunteered for a different table, but the fiber arts table needed more people so I switched over.  I was a little scared because I'm still extremely new at all of this, but I figured that I could help people interested since I was still very new myself and had a fresh perspective of what it is like to try to figure out a new skill and try to navigate SCA stuff in general (I'll be honest, my friends have been massively helpful in answering tons of questions).

I prepped a historical backstrap weaving example for me to work on during the demo and I prepped my two modern (non-historical) looms with other tablet weaving projects.  I neglected to mention that I bought a second loom that is specifically for tablet weaving from a great little etsy store.  I like it because I don't have to move the weave and reset the tension as many times so anything I make on it looks much nicer and more consistent!  Plus, I can weave things with more cards (greater width) because the posts are longer.  Here's the link to what I purchased - I really really love it even though I've had to repair it a few times: https://www.etsy.com/listing/467729493/the-mandolin-card-tablet-large-sized?ref=shop_home_active_7

I did my best with the demo and printed cards to explain what things were, why I used them, and what my process was.  It was a fun experience and I got to chat with a lot of people in the community that were interested in what we were doing and meet a lot of people from the barony.  The Stromgard Chatelaine did an amazing job setting it all up and I was really happy to be a part of the event.
This is the historical project I set up for the demo.  Backstrapping is pretty much weaving tied to an object where the other end is attached to my belt and I lean back for tension.  I got it started before arriving at the demo so I could just pick it up there.  This pattern is based on a historical Osberg sample find - I think it is really pretty even though I'm kind of butchering it doing in the traditional way - I guess I'm much more used to using a loom at this point!

Here I am weaving at the demo in my Norse garb!

Here's my setup and all the things I brought with me to show!

Another picture of me and my projects!

I finished this historical project at the demo.  David is going to use it as his fighting favor from me since I'm his inspiration!


Wool Belt Projects

I started a bunch of projects for myself and friends in September 2017 - almost all of which were belts.  Even though I had just started, I felt that I could make something that someone might want to wear that was nice!  I was happy to wear the wool garters I made in the previous post and my friends were very encouraging, so why not?  This post contains some of the belts I made for myself and friends.  The first couple are for me and a lady friend of mine and the bottom two are for a squire (in the SCA they wear red belts) and a knight (they wear white belts).

All of these are basic patterns that I found in this really useful book that a friend told me about: http://www.salakirjat.net/product/74/applesies-and-fox-noses---finnish-tabletwoven-bands

Half of it is in Finnish and half of it is in English, but it has been the single most helpful text resource I've found thus far.  I still use this book to double check that I've set my patterns the correct way!  I highly recommend it to anyone that is considering learning tablet weaving.  I have some other books, but they weren't nearly as helpful and this one has a lot of historical patterns!

This is a belt I made for me!
Finished belt (if you look closely you can see that I made a mistake in this pattern, but I decided to just use it anyway - sometimes you just have to except that you made a small mistake that other people probably won't notice unless they look really closely!).

A wider belt for my friend Stephanie in the colors she requested.
Finished belt - I made this before I looked at other belts and noticed they had left string to look like tassels.
Different belt pattern for a fancy squire belt for David!


Finished squire belt for David - this is after I learned that I should leave some thread for that pretty tassel look!
Here's a knight belt I made for my friend Colin - I forgot to take an in process photo of this one, but I did it all the same color so you can't see the pattern very well.  It looks nice and will be a good informal belt!


In Person Experience

I am really fortunate to live close to a lady that is extremely talented at tablet weaving (and all sorts of other weaving).  Drifa is a fellow SCAdian and I was fortunate enough to be able to learn some tips from her in person since many of my friends (some from quite far away) all told me she was *the* authority in this craft.  Lucky me that she lives within 45 minutes of me!  Her blog can be found here, I'm a big fan of it: https://drifasweaving.wordpress.com/

When I went to visit her I had recently purchased a small inkle loom because I had read that inkle looms could be adapted for tablet weaving.  Drifa taught me how to string my warp on the loom and how to do a continuous warp.
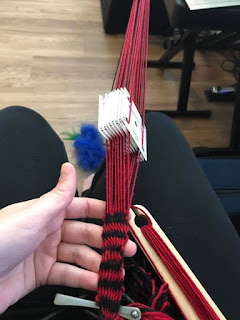
The warp is the thread on the loom or the thread which you are weaving through.  The weft is the thread you pass through the warp with.  I wanted to show a picture because I didn't know what these terms meant when I started.
Prior to coming to Drifa's to learn technique, I had seen the continuous warp done by Linda Hendrickson on youtube and found it to be particularly helpful before seeing it done in person on an inkle loom: https://www.youtube.com/watch?v=eConIrGd7Og

Once my loom was ready, Drifa showed me another basic pattern and taught me a few tricks on how to pull the weft back and hold tension until it has completely passed through the warp.  This helped me make the sides of the weave much more even and neat.  It also helped with the consistency of the pattern.  Below are some photos of that project - note how much better it looks than the first two I did on my own!  In person training is very very helpful if it is an option!
I still really love this pattern - see how nice and neat it looks with the right technique?

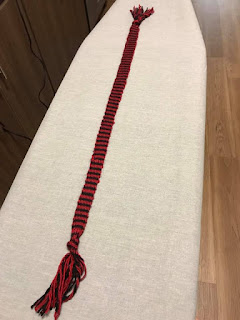
Here is the finished product - I use these as garters for my linen stockings!
I wanted to post about the thread/yarn I used for my wool products!  I actually use a wool/silk blend.  The brand is Cascade Venezia Sport and it is a 70% Merino Wool, 30% Silk blend.  I like it a lot because it has the feel and thickness of wool and doesn't pill as much.  I've used it for all of the wool products I've made so far.

The Cascade Venezia Sport Wool/Silk blend I use - it is really nice!


Starting my tablet weaving journey

I joined the SCA in August 2017 and like many persons, I wanted to find a craft that would interest me and help me get involved and meet people.  I chose card/tablet weaving because it fit the medieval Norse persona I chose and because it looked beautiful, intricate, and something that could be worked on for multiple years during my participation in the SCA.  My friends also were keen on the idea of me making trim for them, so they were enthusiastically supportive!

The first resource I found was from Shelagh Lewins (Copyright © 2003): http://www.shelaghlewins.com/tablet_weaving/TW01/TW01.htm

This page is a great resource for an introductory lesson on tablet weaving and I used it extensively when I first started.  My first two projects were from the basic patterns on this page and were backstrap woven in the historical method.  I followed the directions and managed to make something, which was a wonderful moment!  Pictures below show those first attempts:

You can see that I wasn't really certain of tension or how to use my shuttle to push back the weft (or what a weft is).

I definitely made something!  I was really proud it looked like the pattern and that it was an actual woven thing!
I improved a little bit on my second project - I tried the diagonal pattern and tried to weave a little more evenly and figured out how to even out the weft as I wove.  I still didn't have a clue what to do with the edges so I didn't tighten them at all.
Experienced weavers can tell that the tablets are set in the wrong direction, so the pattern is actually on the backside instead of the side I was weaving.  I was really early in the process so I had no idea that this wasn't right.

I managed to weave the bottom side into the right pattern even though I couldn't see it, so I guess that's a success!

Finished product - much better than the first attempt, so you can see that it is easy to improve quickly!
I don't consider myself an overly crafty person and I've certainly never weaved before I started doing this in the SCA.  I do think I'm a decent cook and weaving is a lot like following a recipe.  Once you learn how to read the patterns and have some understanding of how things are supposed to be set up, it is easy to follow the instructions of the pattern and make something that looks decent!  I was really proud of my progress and it encouraged me to keep going!